Guitar Buzzing With a Capo? Check Position and Pressure
Your guitar sounds clear without a capo, but some strings rattle when you attach it. Compare both conditions with the same picking strength before adding pressure. This lesson uses a six-string guitar in standard EADGBE tuning and a normal full-width capo. It focuses on checking sound at capo 2, not on renaming chord shapes.
Wichtige Funktionen und Optionen
- Place the pad just on the headstock side of fret 2, parallel to the wire and covering all six strings
- Listen one string at a time. Adjust pressure only if your capo is designed for it
- At capo 2, unfretted strings 6 to 1 sound F♯, B, E, A, C♯, F♯. Do not tune them back to EADGBE
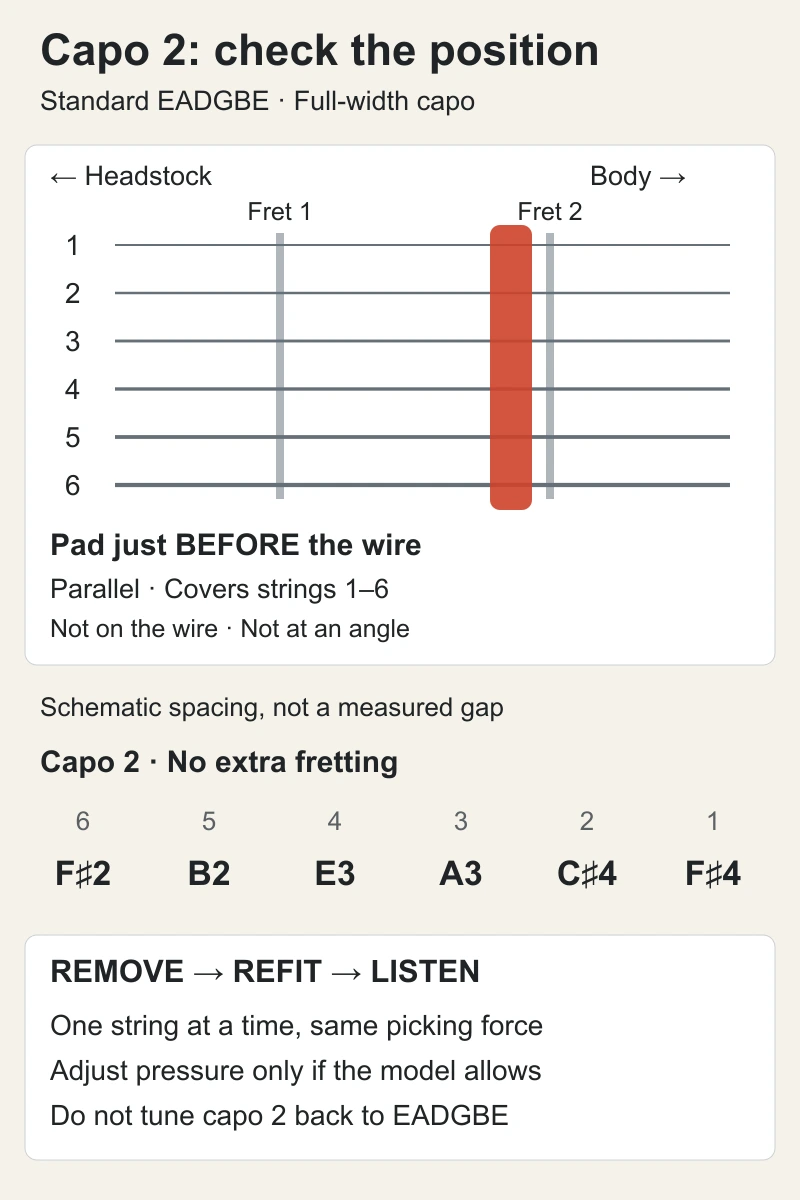
1. Remove, compare, then refit behind the fret
Remove the capo, tune, and pick strings 6 to 1 at a normal level. Fit it at fret 2 and repeat with no chord held and the same attack. If the problem appears only after fitting it, start with placement. In the diagram, the headstock is left and the body right. Put the pad a little to the left of the second fret wire, not directly over it. Keep the pad parallel to the wire and cover both outer strings too. Release and refit according to the maker's instructions, without dragging the strings sideways. Do not force a clamped capo along the neck.
2. Check the mechanism before changing pressure
If your model has a pressure screw or other adjustment, use its instructions and make small changes, listening to all six strings again. Too little pressure can buzz; too much can pull notes sharp. A fixed-spring model may have no equivalent adjustment. Do not keep squeezing it onto the strings, bend its spring, or modify it. If one string still fails after careful placement, check pad wear and whether the capo suits the fretboard's width and curvature. Look for the maker's instrument designation, such as classical or steel-string guitar. Take both guitar and capo to a shop if unsure; buying a new capo need not be the first step.
3. Separate a rattle from a pitch change
A rattling note and a sustained note that reads sharp are different observations. At capo 2, with no extra fretting, the notes from string 6 are F♯2, B2, E3, A3, C♯4 and F♯4: two semitones above the standard open strings. That expected transposition is not a fault. In CHORDOCK, read the detected note and cents; do not mistake the standard-tuning E2–E4 reference for your capo-2 targets. Check placement and pressure first, then make small tuning corrections if needed. Check again after removing the capo. If the same area buzzes without it, a note suddenly becomes dead, or refitting does not help, record the string and position and consult a guitar shop. Do not diagnose or adjust the neck or nut by guesswork.
Pio: My E became F♯ after fitting the capo. Should I change it back?
Dock-sensei: That is expected with standard tuning and capo 2. Do not lower it to E. Check placement and each string first, keeping a rattle separate from the expected change in note name.
An eight-minute check
- 2 minutes: remove the capo and tune to standard EADGBE. Pick all six strings separately and note any that buzz. Do not turn a tuner blindly; stop and check if you are unsure of the target note
- 2 minutes: fit capo 2 following its instructions. Check the headstock side of the wire, parallel alignment and coverage of both outer strings. Pick strings 6 to 1 with no chord held and the same attack
- 2 minutes: release and refit if a string fails. Change pressure only on an adjustable model. Listen after each change rather than repeatedly tightening harder. Rest your hand
- 2 minutes: start the tuner yourself and check F♯, B, E, A, C♯, F♯ one string at a time. Judge rattling by ear and record it separately from pitch. Stop the tuner, remove the capo and check tuning again
Review and references
Last content review:
Manufacturer guidance informed placement, pressure and checking steps; promotional superiority claims were excluded. Both languages were reviewed twice for headstock-side placement, fixed versus adjustable mechanisms, expected transposition versus fine tuning, and the tuner's reference versus detected notes. Six pitches were independently calculated. The schematic and eight-minute check with rests are editorial suggestions.
- Applying the Capo — Shubb Capos
- Capo FAQs: Pressure and Fretboard Radius — Shubb Capos
- Beginner's Guide to Using Kyser Capos Effortlessly — Kyser Musical Products / Mike Cross
References support the editorial review. They do not provide an individual diagnosis or guarantee compatibility with every instrument or model.
Häufig gestellte Fragen
Which side is 'behind the fret'?
Here it means the headstock side of the target wire. For capo 2, use the space between wires 1 and 2, close to wire 2. The diagram puts the headstock left and body right; distances are schematic.
Will tightening always remove the buzz?
No. Placement, fit and the instrument also matter. Adjust pressure only on a model designed for it and follow its instructions. Do not bend or dismantle a fixed spring.
What if only one string fails?
Test without holding a chord, then check that the capo is straight and covers that string. If refitting does not help, compare the same string without the capo and describe the symptom to a shop.
Should I retune capo 2 to standard EADGBE?
No. This capo-2 exercise uses F♯, B, E, A, C♯, F♯ with no extra fretting. EADGBE is the no-capo target. Correcting a small tuning error after fitting the capo is not the same as restoring the original note names.
Should I check tuning after removing the capo?
Yes, especially if you made fine adjustments while it was on. Check standard tuning in small steps. Stop if you meet unusual resistance or anything seems wrong.
Can the tuner diagnose the cause of buzzing?
No. CHORDOCK detects pitch through the microphone; it does not diagnose capo placement or damage. Start it and grant microphone permission yourself, then play one string at a time. Eight minutes, including rests, is an editorial suggestion, not a guaranteed fix.